Tuesday, March 30, 2010
Golden Oreo Cupcakes
Friday, March 26, 2010
That's how they do that!
Thursday, March 25, 2010
Lordy Lordy, David turned 40!
Wednesday, March 24, 2010
Roasted Banana Cupcakes with Honey-Cinnamon Frosting
Ingredients:
3 ripe bananas, plus 2 more for garnish
2 cups cake flour, sifted
½ teaspoon baking soda
½ teaspoon baking powder
¾ teaspoon salt
1 stick unsalted butter, room temp
¾ cup sugar
3 large eggs, separated
½ cup sour cream
1 teaspoon pure vanilla extract
Preheat your oven to 400 degrees. Place three of the bananas on a baking sheet and roast for about 20 minutes (the peels will darken). Remove from the oven and allow to cool. Reduce the oven temp to 350.
Line your standard muffin tin with paper liners. In a large bowl, sift together the cake flour, baking soda, baking powder and the salt. In the bowl of a stand mixer set to medium-high speed, cream together the butter and sugar until pale yellow and fluffy. Add in the egg yolks, one at a time and beat until each is fully incorporated. Add in the cooled roasted bananas and beat to combine. Add in the flour mixture in three batches, alternating with two additions of the sour cream. Add in the vanilla and beat to combine.
In another bowl, use an electric mixer set on high speed to whisk the egg whites to soft peaks. Fold 1/3 of the whites into the batter to lighten. Fold in the remaining whites in two batches.
Divide the batter evenly among the liners (about ¼ cup each). Bake for about 10 minutes, rotate pan, bake an additional 10 minutes or until done. Cool on wire rack. You will more than likely have enough batter to make four more cupcakes.
Honey-Cinnamon Frosting
Ingredients:
2 1/2 cups confectioners’ sugar, sifted
1 cup (2 sticks) unsalted butter, at room temperature
2 T honey
1/4 t ground cinnamon
Directions:
With an electric mixer on medium speed, beat all ingredients until fluffy and smooth. Pipe onto the cooled cupcakes and garnish with banana slices or banana chips.
Makes 16 cupcakes
Here is a couple of different ideas for presentation:
A can't live without!
This is at the top of my list of things I can't live without. I received my KitchenAid 5-Quart Artisan Mixer as a wedding gift 7 years ago. I registered for it at Bed Bath and Beyond, and because of the price ($299.99) I never thought we'd get it. I was pleasantly surprised when it showed up on my doorstep! I think it was the best wedding gift we got. It has gotten a great deal of use (and abuse) over the years, but it keeps on mixin!
I love this mixer for several reasons:
#1. The steel bowl is indestructible. You can drop it on the floor, and won't crack!
#2. The mixing attachments (beater and paddle) are easy to get on and off.
#3. The bowl is stationary and easily locks and unlocks at the base. It won't "fly" off the turntable like my moms old one!
#4. It comes in 17 colors!
Here's another little secret... if you sign up for the Bed Bath and Beyond mailing list, you'll start getting coupons for 20% off one item and $5 off your entire purchase. If you use your 20% coupon toward the mixer, that brings the price down to $239.99. What a deal!
If you want something a little more heavy duty, then there is also a KitchenAid ProLine 6-Quart Stand Mixer available for $399.99.
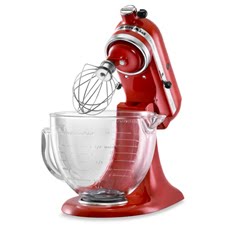
They also just came out with a KitchenAid 90th Anniversary Stand Mixer in candy apple red, however it comes with a glass bowl and a $349.99 price tag. It's pretty to look at, but I think I'll stick with what I have!
Happy mixing!
I love this mixer for several reasons:
#1. The steel bowl is indestructible. You can drop it on the floor, and won't crack!
#2. The mixing attachments (beater and paddle) are easy to get on and off.
#3. The bowl is stationary and easily locks and unlocks at the base. It won't "fly" off the turntable like my moms old one!
#4. It comes in 17 colors!
Here's another little secret... if you sign up for the Bed Bath and Beyond mailing list, you'll start getting coupons for 20% off one item and $5 off your entire purchase. If you use your 20% coupon toward the mixer, that brings the price down to $239.99. What a deal!
If you want something a little more heavy duty, then there is also a KitchenAid ProLine 6-Quart Stand Mixer available for $399.99.
They also just came out with a KitchenAid 90th Anniversary Stand Mixer in candy apple red, however it comes with a glass bowl and a $349.99 price tag. It's pretty to look at, but I think I'll stick with what I have!
Happy mixing!
Strawberry Surprise!
Oh, just look at my beautiful garden!
I just loved Winnie the Pooh when I was a child, and when I ran across these cupcakes on the Disney Family website I thought they were just adorable! These miniature carrot topped cupcakes were inspired by Rabbit, who was forever working hard to protect his garden from uninvited guest. I would have never guessed the carrots were made out of orange Starbursts and green Twizzlers! Can you just imagine the look on a childs face when they see these? I know I would have loved them!
Orange Starburst candies (one for each carrot)
3. Cut 1 1/2-inch lengths from a Twizzler and then snip them in half vertically. Turn each half into a leafy top by cutting fringe in one end.
4. Insert the carrot tops into the holes in the carrots. If they don't fit, try trimming the bases a bit to taper them. Or use the skewer tip to gently push them in place.
5. When all the carrots are made (you'll want 2 or 3 per cupcake), frost the cupcakes and sprinkle the centers with cinnamon sugar to resemble a patch of sandy soil.
You'll need:
Orange Starburst candies (one for each carrot)
Kitchen skewer or toothpick
Kitchen scissors
Green Twizzlers
Batch of chocolate cupcakes
White frosting
Cinnamon sugar
1. With clean hands, knead each Starburst candy and roll it into a mini carrot shape. If the candy is too stiff, you can microwave it for 4 or 5 seconds. But don't overdo it -- the candy will melt if it's overheated.
2. Use the skewer or toothpick to make a hole about 1/4-inch deep in the top of each carrot.
3. Cut 1 1/2-inch lengths from a Twizzler and then snip them in half vertically. Turn each half into a leafy top by cutting fringe in one end.
4. Insert the carrot tops into the holes in the carrots. If they don't fit, try trimming the bases a bit to taper them. Or use the skewer tip to gently push them in place.
5. When all the carrots are made (you'll want 2 or 3 per cupcake), frost the cupcakes and sprinkle the centers with cinnamon sugar to resemble a patch of sandy soil.
6. "Plant" the carrots in the cupcakes, leaving 1/4 to 1/2 inch of the orange candy showing.
Tuesday, March 23, 2010
Nobunny knows Easter better than Cadbury..and the Irish!
~PS~
Just for grins and giggles, here is my favorite Cadbury commercial! Bawk meow bawk meow!
Cadbury Bunny Tryouts
Easter Bunny cake... or cupcake cake?
I know what you're thinking, this isn't a cupcake silly woman! Au contraire! It was recently suggested that I make my Easter Bunny cake for work, so I was Googling some pictures to post. This is what I found! The book is called the Bakers Cut Up Cake Party Book and it was published in 1973 (the year after I was born!). I had no idea where the cake design originally came from, I just know I've been making it since I was a teenager (yes, it's that easy!). I also didn't know that there was a full-bodied Easter Bunny cake. I'm trying to decide which I like better? These could easily translate into a Easter Bunny cupcake cake as well. All you'd need to do is lay them out in a similar pattern and then ice it the same way. I may have to put that to the test! I love to let my creative juices flow! In my search I also found an earlier version of the same book that was from 1959 which was titled Baker’s Coconut Cut-Up Cakes. Even though cake decorating has advanced alot since those books were published, I bet these will still come in super handy when I have children. Vintage rocks! eBay here I come!
1959
1973
1959
1973
I Heart Butterflies!
Etsy is my latest obsession, so you'll probably see a million posts about it. It's like eBay for crafty creative people. If that describes you, then you will just fall in love with it like I have! I have a long list of things that make me smile, and Butterflies are one of them. There is just something about a Butterfly flittering by that makes you stop what you're doing and pay attention to it. I found this lovely little Butterfly cupcake wrapper today. Isn't it just the most feminine dainty little thing you've ever seen? It's from a seller named CupcakeFlair. Once I figure out what sort of cupcake will do it justice, I'm SO ordering them!
Subscribe to:
Posts (Atom)